
Introduction to the API service | NiamonX API
🔐 How to Create, Reissue, and Monitor Your NiamonX API Key
This guide explains how to create your NiamonX API key, reissue it when needed, keep it secure, and monitor your daily API usage directly from the NiamonX Dashboard.
The NiamonX Dashboard API key system is now connected to the NiamonX Core API infrastructure. This means API keys are generated and managed through secure backend Core API calls instead of the legacy local Dashboard key generation system.
1. Requirements
To create and use a NiamonX API key, you must have an active paid plan with API access enabled.
API access is available only for supported paid plans.
Free-tier users and users on tariff plan 1 Explorer cannot create, reissue, or use API keys.
If your current plan does not support API access, the API key generation buttons will be disabled in the Dashboard.

2. Open the API Key Dashboard
Visit the official API key management page:
👉 https://dash.niamonx.io/api-key
On this page, you can:
-
Generate a new API key
-
Reissue your existing API key
-
View your current API usage statistics
-
Monitor daily limits and remaining quota
-
Check which tools are used most often
-
Review usage by API category
3. Creating an API Key
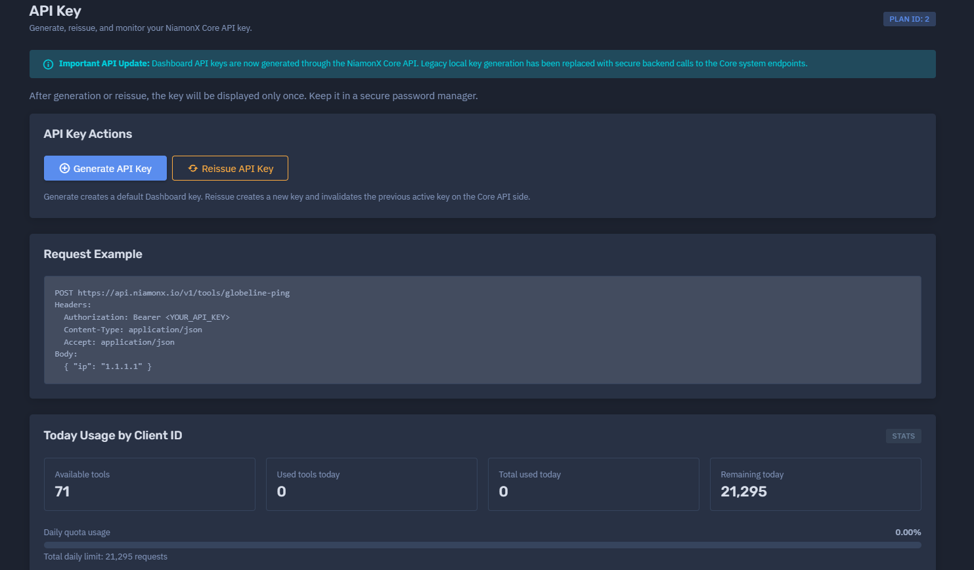
To create a new API key, click:
Generate API Key
The Dashboard will securely send a backend request to the NiamonX Core API and create a default Dashboard API key for your account.
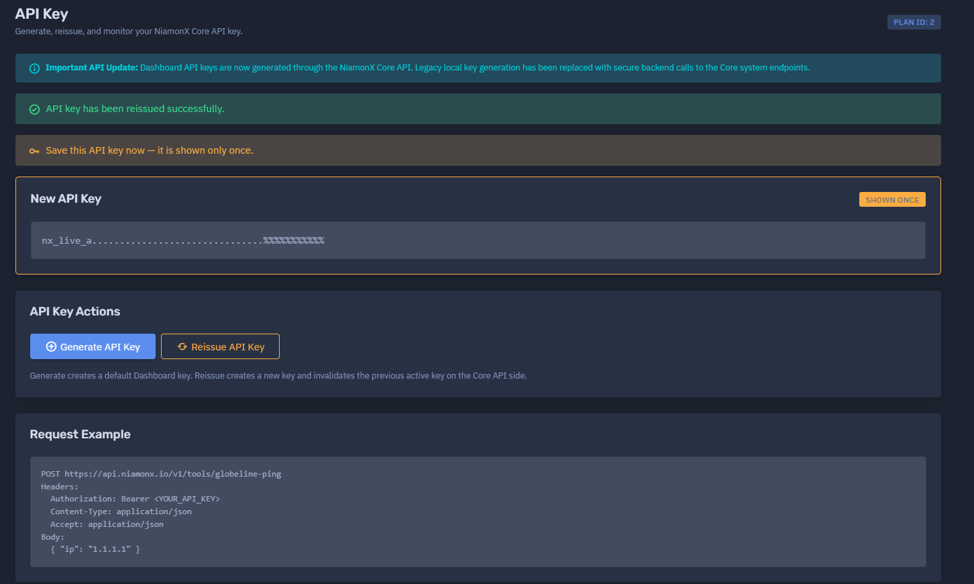
The generated key will be shown only once.
⚠️ Important:
After generation, the API key will not be displayed again.
Copy it immediately and store it in a secure place, such as an encrypted password manager or a protected environment variable.
Do not store API keys directly in frontend code, public repositories, screenshots, chat messages, or documentation examples.
4. Reissuing an API Key
If you need to replace your existing API key, click:
Reissue API Key
Reissuing creates a new API key and invalidates the previous active key on the NiamonX Core API side.
Use reissue when:
-
You lost access to the previous key
-
You suspect the key may have been exposed
-
You want to rotate credentials for security
-
A production key needs to be replaced
-
A team member who had access to the key should no longer use it
⚠️ Important:
After reissue, update the API key in all systems, scripts, servers, CI/CD pipelines, and environment variables where the old key was used.
5. API Key Security
Your API key is a private credential. Anyone with access to it may be able to make API requests under your account and consume your quota.
Recommended storage methods:
NIAMONX_API_KEY="YOUR_API_KEY"
Example usage in a backend application:
export NIAMONX_API_KEY="YOUR_API_KEY"
Never expose your API key in:
-
Public GitHub repositories
-
Frontend JavaScript
-
Browser localStorage
-
Screenshots
-
Public documentation
-
Shared logs
-
Client-side mobile apps without secure backend protection
6. Main API Endpoint Format
NiamonX API tools are available through the Core API:
https://api.niamonx.io/v1/tools/
Each tool has its own endpoint path.
Example:
POST https://api.niamonx.io/v1/tools/globeline-ping
7. Authentication
All API requests must include your API key in the Authorization header.
Authorization: Bearer YOUR_API_KEY
Content-Type: application/json
Accept: application/json
Do not use the Dashboard system token.
The system token is used only internally by the NiamonX Dashboard backend to communicate with the NiamonX Core API.
8. Example Request
GlobeLine Ping
POST https://api.niamonx.io/v1/tools/globeline-ping
Headers:
Authorization: Bearer YOUR_API_KEY
Content-Type: application/json
Accept: application/json
Body:
{
  "ip": "1.1.1.1"
}
Example cURL request:
curl -X POST "https://api.niamonx.io/v1/tools/globeline-ping" \
  -H "Authorization: Bearer YOUR_API_KEY" \
  -H "Content-Type: application/json" \
  -H "Accept: application/json" \
  -d '{"ip":"1.1.1.1"}'
9. API Key Dashboard Analytics
The API Key Dashboard now includes daily usage analytics.
The statistics are loaded by client ID and show usage for the current day.
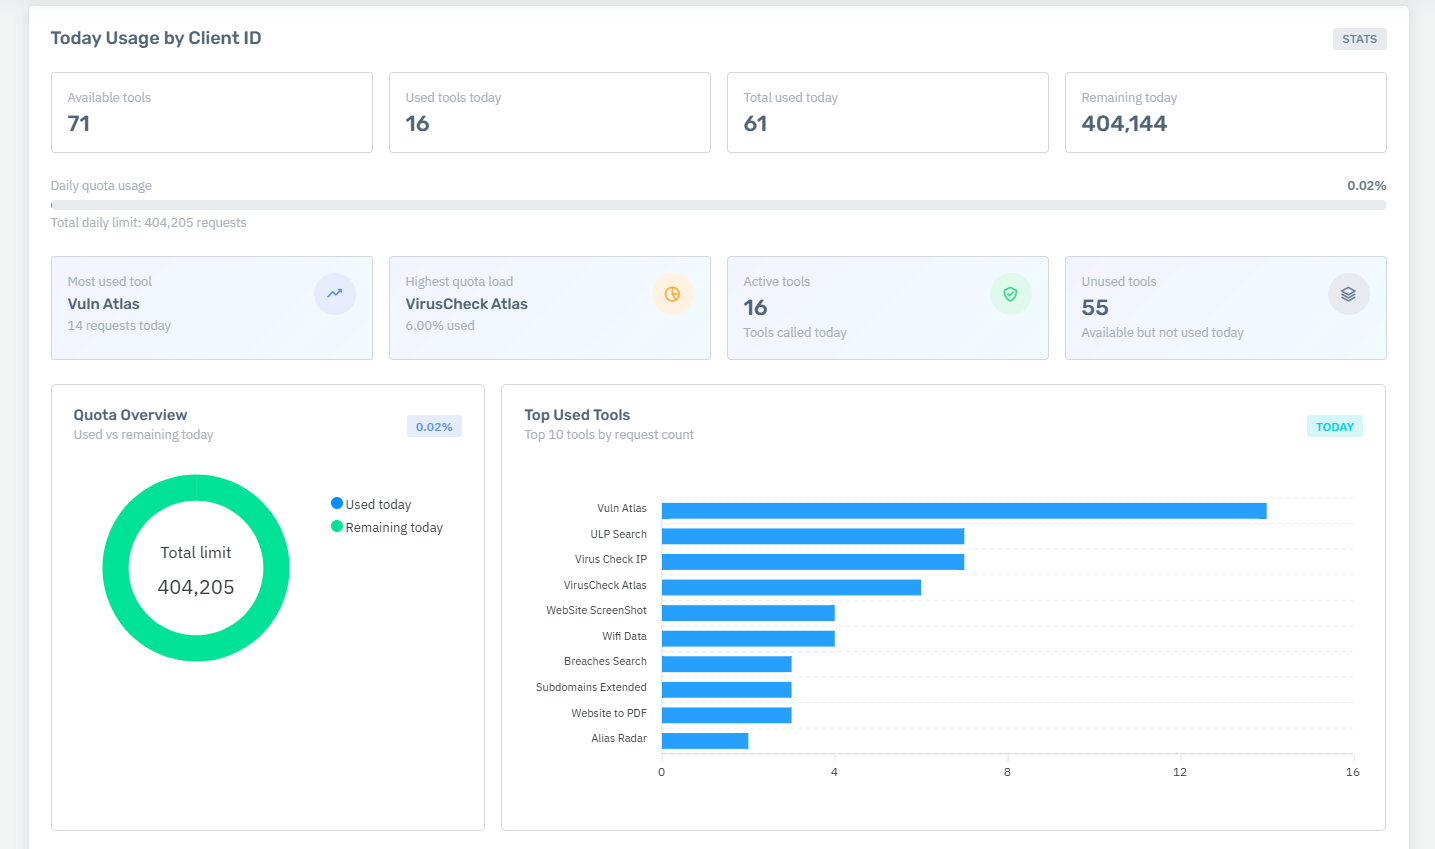
10. Usage Overview
The Dashboard displays a summary of your daily API usage, including:
-
Available tools
-
Used tools today
-
Total daily request limit
-
Total requests used today
-
Remaining requests today
-
Total percentage of quota used
Example overview:
| Field | Description |
|---|---|
| Available tools | Number of API tools available for your plan |
| Used tools today | Number of unique tools used today |
| Total daily limit | Total number of requests available today |
| Total used today | Number of requests already used today |
| Remaining today | Number of requests still available |
| Total percent used | Percentage of your daily quota already consumed |
11. Visual Usage Charts
The Dashboard also includes visual charts to make API monitoring easier.
Quota Overview
Shows how much of your total daily quota has been used and how much remains.
This helps you quickly understand whether your account is close to its daily limit.
Top Used Tools
Shows the most frequently used API tools for the current day.
This is useful for identifying which tools consume most of your requests.
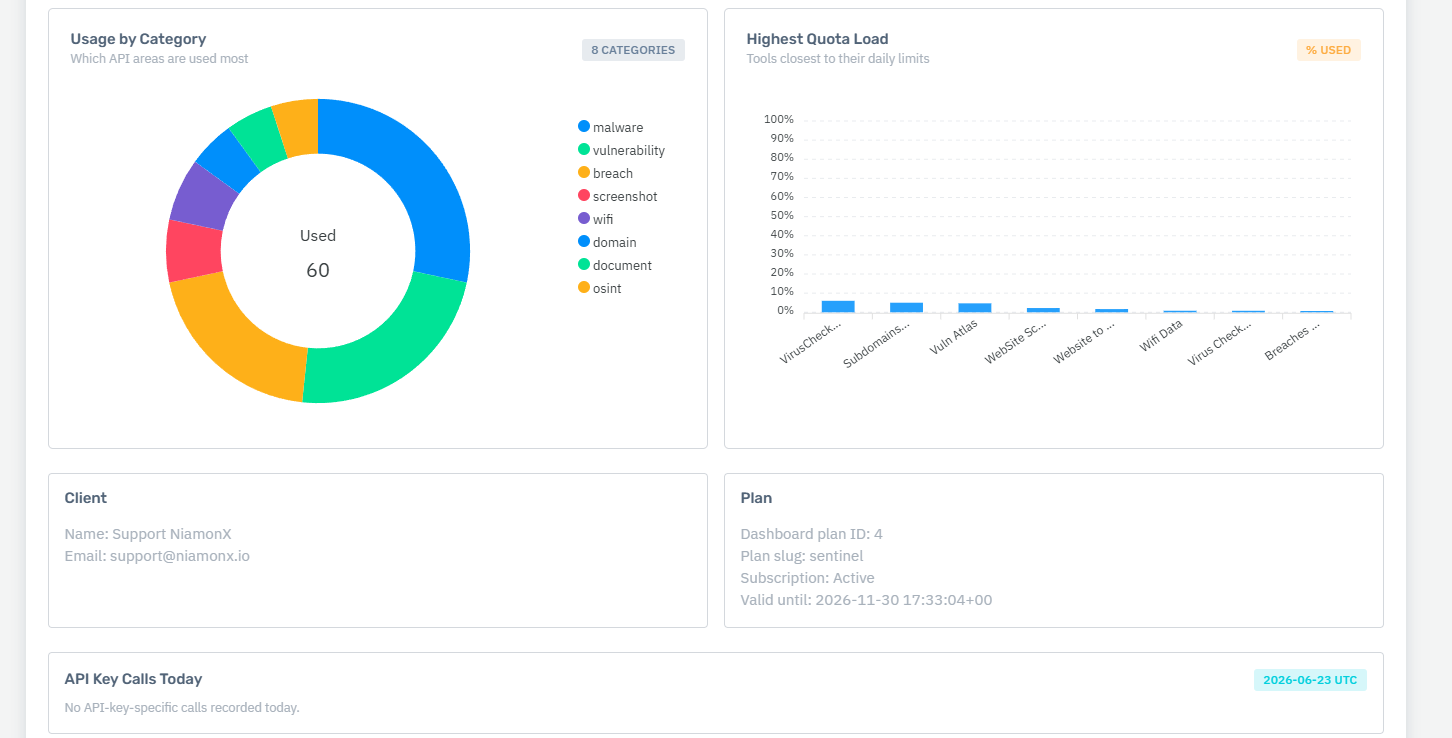
Usage by Category
Groups usage by API category, such as:
-
OSINT
-
Network
-
DNS
-
Domain
-
Security
-
Malware
-
Breach
-
Utility
-
Document
-
Screenshot
This helps you understand which areas of the API you use most.
Highest Quota Load
Shows tools that are closest to reaching their daily limits.
This is useful for preventing unexpected limit errors in production systems.
12. Tool Usage Table
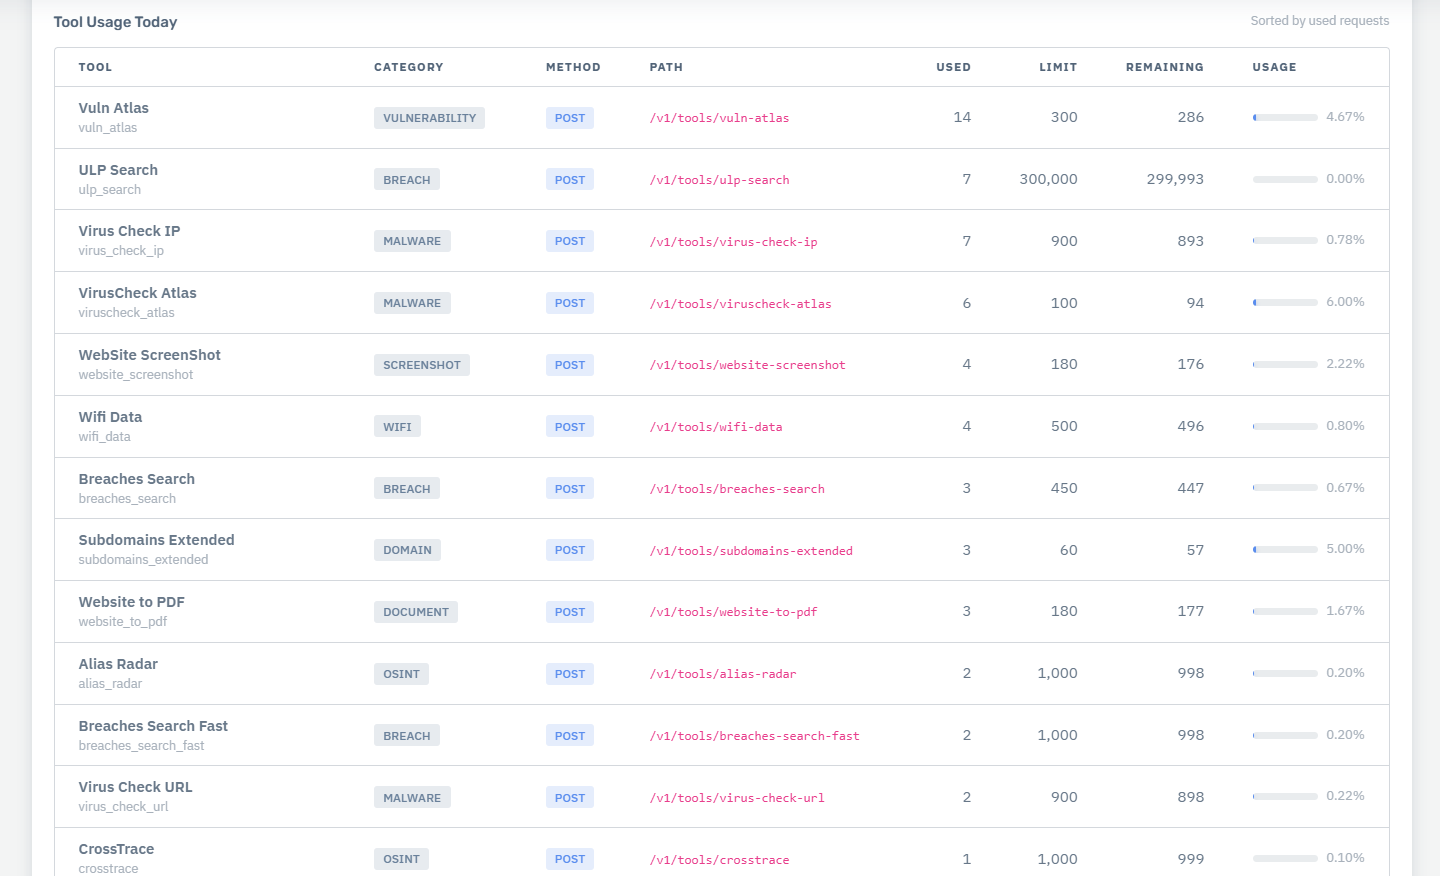
Below the charts, the Dashboard displays detailed usage for each API tool.
The table includes:
| Column | Description |
|---|---|
| Tool | Human-readable tool name |
| Tool slug | Internal tool identifier |
| Category | API tool category |
| Method | HTTP method used by the tool |
| Path | API endpoint path |
| Used | Requests used today |
| Limit | Daily request limit |
| Remaining | Requests still available today |
| Usage | Percentage of the tool quota already used |
This allows you to monitor both overall account usage and per-tool limits.
13. Client and Plan Information
The Dashboard may also display account and subscription information returned by the Core API, including:
-
Client name
-
Client email
-
Dashboard plan ID
-
Plan slug
-
Subscription status
-
Subscription validity period
-
Last Dashboard/Core synchronization time
This helps verify that API access is connected to the correct user account and active subscription.
14. Possible API Responses
| HTTP Code | Description |
|---|---|
| 200 | ✅ Request completed successfully |
| 400 | ❌ Invalid input data or validation error |
| 401 | 🚫 Invalid, missing, or expired API key |
| 403 | ⛔ Access denied, plan restriction, disabled tool, or insufficient permissions |
| 404 | ❓ Unknown tool, endpoint, or resource |
| 405 | ⚙️ Method not allowed |
| 429 | ⏳ Daily request limit, cooldown, or rate limit exceeded |
| 500 | 🔥 Internal server error |
15. Plan Restrictions

Tariff plan Explorer 1 is not allowed to create or use API keys.
If your account is on plan Explorer 1, the Dashboard will show an API access restriction message and the API key generation actions will be disabled.
To enable API access, upgrade to a supported paid plan with API access included.
16. Best Practices
For production usage:
-
Store your API key in environment variables
-
Use HTTPS for all requests
-
Rotate your key regularly
-
Reissue your key immediately if compromise is suspected
-
Monitor quota usage from the Dashboard
-
Watch the “Highest Quota Load” chart to avoid hitting limits
-
Do not expose API keys in client-side code
-
Use backend proxy logic if integrating with web or mobile applications
-
Log request IDs and API errors for debugging
-
Avoid hardcoding keys into scripts or repositories
17. Troubleshooting
I cannot generate an API key
Check that:
-
Your subscription is active
-
Your plan supports API access
-
You are not on tariff plan
1 -
You are logged into the correct Dashboard account
My API request returns 401
This usually means:
-
The API key is missing
-
The API key is invalid
-
The API key was reissued and the old key is no longer valid
-
The
Authorizationheader is formatted incorrectly
Correct format:
Authorization: Bearer YOUR_API_KEY
My API request returns 429
You may have exceeded:
-
Daily account quota
-
Tool-specific daily limit
-
Cooldown limit
-
Rate limit
Check the Dashboard usage analytics to see which limit was reached.
My old key stopped working
If you clicked Reissue API Key, the old key was invalidated.
Replace it everywhere with the new key shown after reissue.
18. Quick Start Checklist
Before using the API, make sure you have completed the following:
-
Active supported paid plan
-
API key generated from the Dashboard
-
API key copied and stored securely
-
API key added to your backend environment variables
-
Requests sent to
https://api.niamonx.io/v1/tools/ -
Authorization: Bearer YOUR_API_KEYheader included -
First test request completed successfully
-
Dashboard usage analytics checked after testing
✅ You’re Ready to Start
Your NiamonX API key is now ready to use.
You can generate or reissue keys from the Dashboard, securely authenticate API requests through the Core API, and monitor your daily usage with visual analytics, quota charts, category breakdowns, and per-tool statistics.
Start with a small test request, confirm that the response is successful, and then integrate the API into your production workflow.